What is
fracture toughness Kc?
Fracture toughness, Kc, is the resistance of a material
to failure from fracture starting from a preexisting crack. This
definition can be mathematically expressed by the following expression:
Kc = Y σ SQRT{π a}
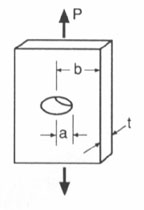
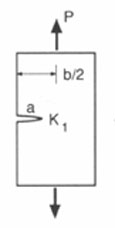
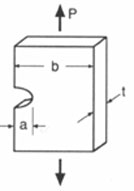
Where Y is a dimensionless factor dependent on: the geometry of the crack and material, the loading configuration (i.e. if the sample is subject to tension or bending), and the ratio of crack length to specimen width, b. is the amount of load (stress) applied to the specimen, and a is the crack length.

Source Figures 1,2,3: Materials Science
and Engineering: An Introduction, 3rd Edition, John Wiley
& Sons, Inc. New York.
Figure 1 shows that a is not always the total length of
the crack, but is sometimes half the crack length, as for an interior
crack. The values for Y vary with respect to the shape
and location of the crack. Some useful values of Y for short cracks
subjected to a tension load are as follows:
Y = 1.00 For an interior crack similar to the crack shown in Figure 1
Y = 1.12 For a through-thickness surface crack as shown in Figure 2
Y = 0.73 For a half-circular surface crack as shown in Figure 3
Fracture toughness, Kc, has the English customary units
of psi in1/2, and the SI units of MPA m1/2.
What is the
plane strain fracture toughness, KIc?
For thin samples, the value Kc decreases with increasing sample thickness, b, as shown by Figure 4.
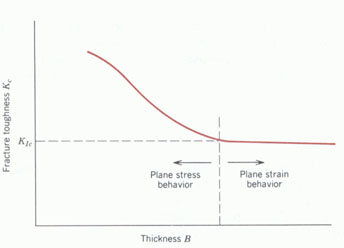
Ultimately, Kc becomes independent of b, at
this point the sample is said to be under the conditions of
plane strain. This fixed value of Kc becomes known as the
plane strain fracture toughness, KIc. KIc
is mathematically defined by:
KIc = Y σ SQRT{π a}
This value for the fracture toughness is the value normally specified because it is never greater than or equal to Kc. The I subscript for KIc, stands for mode I, or tensile mode, crack displacement as shown in Figure 5(a).
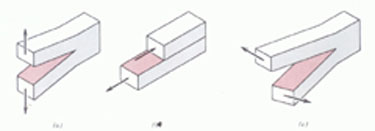
In general, KIc is low for brittle materials and high
for ductile materials. This trend is supported by the KIc
values in Table 1 (3,4).
| ||
| ||
| ||
| ||
Source: Materials Science and Engineering: An Introduction,
3rd Edition, John Wiley & Sons, Inc. New York.
How is KIc experimentally developed?
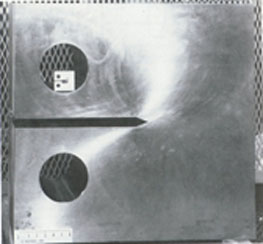
There are many different experiments which can be run in order
to obtain a value for KIc. Almost any size and shape
sample can be used, as long as it is consistent with mode I crack
displacement. A possible, an rather simple, experiment that can
be performed to find a value for KIc involves a sample,
with known dimensions, similar to the one shown in Figure 6 and
a screw-driven universal testing machine. This testing machine
loads the specimen, at a constant strain rate, while a Load vs.
Displacement curve is plotted by a X-Y recorder. From this plot,
a possible value for can be calculated. With this value for ,
KIc can be calculated. For a more in depth explanation
of this specific experiment, please refer to Experiment 6 in the
Laboratory Manual for ESM 3060 (Prof. Duke) (5).
What is the effect of microstructure, temperature, thickness,
and crack size and location on KIc?
As stated in the previous sections, many factors figure into the value of KIc for a given material. By definition (Equation 2), KIc varies with crack size and location, because crack size and location both factor into the value for a. As shown by Figure 4, KIc does not change with sample thickness. This non-variance is due to the condition of plane strain that the sample must be under to have a value for KIc. KIc does vary with temperature and strain rate.

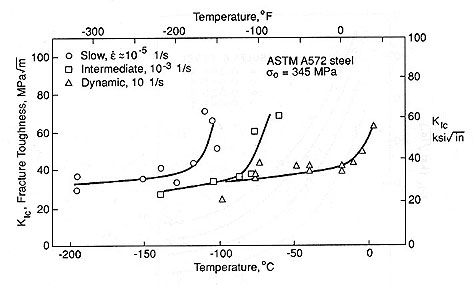
It can be shown, by Figures 7 and 8, KIc increases with decreasing strain rate and increasing temperature. General strengthening methods, such as solid-solution hardening and strain hardening, tend to increase the samples yield stress, but these procedures commonly lead to a decrease in KIc. Additionally, KIc typically increases with decreasing grain size as composition and other microstructural variables are held constant (6,7,8).
Example Problem
1. If a support beam of 4340 Steel (tempered at 260 C) has an
interior crack of length 5 mm, how much stress, σ, can be applied
to it before it is expected to fracture?
Solution:
KIc = Y σ SQRT{π a}
50.0 MPa m1/2 =
1.00 σ SQRT{π{5*10-3}}
(2)
σ = 564 MPa
From Table 1, KIc for 4340 Steel (tempered at 260 C) is 50.0 MPa m1/2. Then by knowing that Y = 1.00 for an interior crack, solve Equation 2 for σ.
Sources
1. Material Science and Engineering: An Introduction, 3rd
Edition, William Calister, John Wiley & Sons, Inc. 1994, p.
193-195.
2. Mechanical Behavior of Materials: Engineering Methods for
Deformation, Fracture, and Fatigue, Norman E. Dowling, Prentice
Hall, 1993, p. 329 - 330.
3. Material Science and Engineering: An Introduction, 3rd
Edition, William Calister, John Wiley & Sons, Inc. 1994, p.
194-196.
4. Mechanical Behavior of Materials: Engineering Methods for
Deformation, Fracture, and Fatigue, Norman E. Dowling, Prentice
Hall, 1993, p. 287-291.
5. ESM 3060 Laboratory Manual, Professor Duke, Virginia
Polytechnic Institute and State University Copy Center.
6. Material Science and Engineering: An Introduction, 3rd
Edition, William Calister, John Wiley & Sons, Inc. 1994, p.
193-195.
7. Mechanical Behavior of Materials: Engineering Methods for
Deformation, Fracture, and Fatigue, Norman E. Dowling, Prentice
Hall, 1993, p. 302-310.
8. Physical Metallurgy Principles, 3rd Edition, Robert
E. Reed-Hill and Reza Abbaschian, PWS Publishing Company, 1994,
p. 737-738.
Sources for the Figures
Figure 1. Mechanical Behavior of Materials: Engineering Methods
for Deformation, Fracture, and Fatigue, Norman E. Dowling,
Prentice Hall, 1993, p. 324.
Figure 2. Mechanical Behavior of Materials: Engineering Methods
for Deformation, Fracture, and Fatigue, Norman E. Dowling,
Prentice Hall, 1993, p. 301.
Figure 3. Mechanical Behavior of Materials: Engineering Methods
for Deformation, Fracture, and Fatigue, Norman E. Dowling,
Prentice Hall, 1993, p. 324.
Figure 4. Material Science and Engineering: An Introduction,
3rd Edition, William Calister, John Wiley & Sons, Inc. 1994,
p. 194.
Figure 5. Material Science and Engineering: An Introduction,
3rd Edition, William Calister, John Wiley & Sons, Inc. 1994,
p. 191.
Figure 6. Mechanical Behavior of Materials: Engineering Methods
for Deformation, Fracture, and Fatigue, Norman E. Dowling,
Prentice Hall, 1993, p. 304.
Figure 7. Mechanical Behavior of Materials: Engineering Methods
for Deformation, Fracture, and Fatigue, Norman E. Dowling,
Prentice Hall, 1993, p. 309.
Figure 8. Mechanical Behavior of Materials: Engineering Methods
for Deformation, Fracture, and Fatigue, Norman E. Dowling,
Prentice Hall, 1993, p. 311.
Submitted by Matt McMurtry
Virginia Tech Materials Science and Engineering
http://www.eng.vt.edu/eng/materials/classes/MSE2094_NoteBook/97ClassProj/exper/mcmurtry/www/matt.html
Last updated: 4/25/97